It is time for another fun use-case and solution that goes a bit further than what you may know with standard out-of-the-box Salesforce tools.
This is a use-case that I am positive you admins and devs run into ALL THE TIME :). If I had a dollar for every time an email alert was requested that needed to send to a related record’s email field or a non-standard email recipient based on some change to a child record, well I would still be writing blogs and working a Salesforce job, but I could probably take the wife out to a nice fancy dinner!
That’s right… email alerts. They are so powerful and used so heavily in Salesforce, but what if I want to merge fields from related records? What if I want to send an email to a recipient email address that isn’t stored on the record kicking things off and isn’t part of the standard suite of options?
These are limitations to the basic email alert system that just don’t serve every need, so I am going to show you some simple ways using process builder to get around some hurdles and then leave you thinking about even more advanced ways to fire emails with data from all kinds of sources using flows and apex.
The problem
The biggest issue I see often when it comes to automating emails or other changes, is the need to send an email to an email address on a related custom object record based on a data change to a record looking up to it. This cannot be done with standard email alert functionality, as we can see posted in the image above.
Let’s say you are using cases for internal task triage as well as customer experience portal uses. Implicit sharing in Salesforce suggests that “If a portal or site user is a contact on a case, then the user has Read and Write access on the case.”
However, you may not want to have a Contact associated to a case you are using for internal-only communication, because you may not want your portal users to see it… So your standard “Related Contact” email alert recipient option won’t help here. Let’s say that you also don’t want to store the email in a new field on the case, because that seems like a waste of a field and you would still need automation to fill it in on the case record.
You can’t use formula fields as email recipients either, so simply creating a formula field to grab an email from a related custom object record won’t help either. At this point the developer in me started scratching his head thinking of all the crazy things I could implement to send emails with whatever I wanted.
I could use an email message in an apex class that could query the intended recipient from the case that was created and set whatever related email I wanted. I could even create said apex class and then make it invokable then use a flow to invoke the apex class to send the email message with whatever recipient and template I wanted (stay tuned because this will certainly be another blog post in the future!). I could even use a flow to do the querying and send in the recipient, merge-field values, etc… as arguments from the flow into an invokable apex class. I could even create an entire email-messaging framework using an interface, a bunch of configuration tables, dynamic apex queries and completely abstract the email message attributes from the apex class into config tables to make everything completely dynamic by creating my query string for each use-case in the flow itself then I could have a dynamic email message service callable from both apex and flows… then I could use a platform event to…
Are you lost yet? What problem was I solving again? I may have started over-engineering a bit…
We could always just shoot the email in a laser attached to the moon from space…
A true Salesforce architect will use as much of the platform’s tools as possible to fulfill a use-case before coding, so before I dove into apex any further, I broke this problem up. What am I really trying to solve and is there a simple way to do it with just the config? As a true pragmatic programmer, sometimes we must ask “is the time to build the perfect, abstract, framework for this use-case worth the pay-off it will provide?” If you have a tool that can solve the more specific use-case you have in minutes, probably not… if the problem keeps coming up with slight variants, perhaps it is.
After thinking a bit more about the limitations of email alerts, I realized that there were two problems with the standard email alert and email templates that I need to solve for often:
Sending to a recipient that isn’t a static email or referenced directly on the record kicking off the email.
Sending an email template that can pull merge fields from multiple related records.
For brevity-sake (and to save myself some content for the next one 🙂 ) I will just be addressing number 1 in this post…
The Solution
So let’s say you have a case type that will be for internal task triage, and you this case type is always created in relation to a custom object record. Your sales staff is trained to generate this case type when it is time for your legal team to do something with that related record’s information. You don’t want the case to include a contact because you don’t want your portal users to see these legal-team cases. However, there is a related contact look-up on the custom object record that this case was created out of, and you do want that related contact to receive a specific email every time these internal cases are kicked off…
How can you send an email alert to a related record’s related contact’s email? Well… the short answer for most admins would be you can’t. There is no way to set up an email alert to simply “dot” into an email address of a related record, you must use the standard, and very limited suite of related record options or an email field directly on the record that is starting the alert.
Now, a good architect also knows you shouldn’t just create a field for an email address on a case, if you have that email address stored on a related parent record up the chain. It is de-normalizing to your database and just a waste of a field. It wouldn’t even get you away from using automation outside of the standard email alert to solve your problem, because you would need to create automation to fill in the email field with the proper email…
Let’s be real, if you are going to use automation to grab the email address you want to send to and then rather than just using it at that same moment store it in a duplicate field on a different record… stop and look at yourself…
This should be you looking at yourself 😀
So what do we do? How can we initiate an email alert on a related record from a child one? This is a fun one I like to call “Invokable Chaining.” It sounds super complicated, but don’t worry, in a matter of minutes you will see how simple this is.
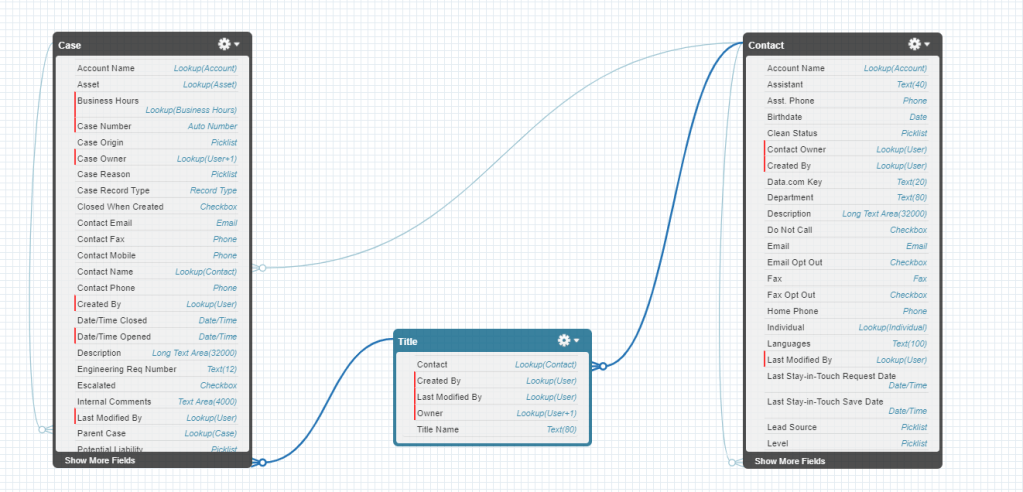
So first we will need a custom object and some relationships established. For simplicity’s sake, I will show this in a data schema I created with some random objects here:
Note that there is a direct lookup to Contact from Case, but remember, we DO NOT want that contact related to these cases, because we don’t want them implicitly shared to that contact if they are a community member… So we need to send an email alert to the contact that is looked up on the Title that is looked up on the case, every time a case of a certain type is created from a button on the Title object.
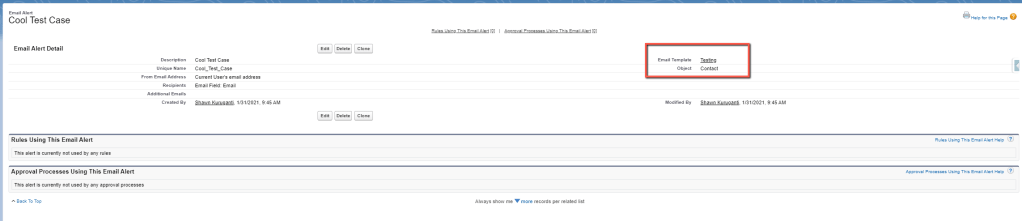
In order to do this you will want to create an email template for use, and a Contact object email alert that sends to that contact.
By now you may be thinking… “But Shawn, aren’t we sending an email alert based on a case being generated? Why is your email alert on the Contact object?! Aren’t you supposed to be some kind of smart guy? Don’t you know anything!?”
While I frequently question my own knowledge, in this case it isn’t ignorance, you will need the email alert to be on the contact because that is the only way to grab the contact’s email and set it to be the recipient without creating that duplicate field we discussed.
Now the fun part… how do kick off this contact email alert from a case creation?
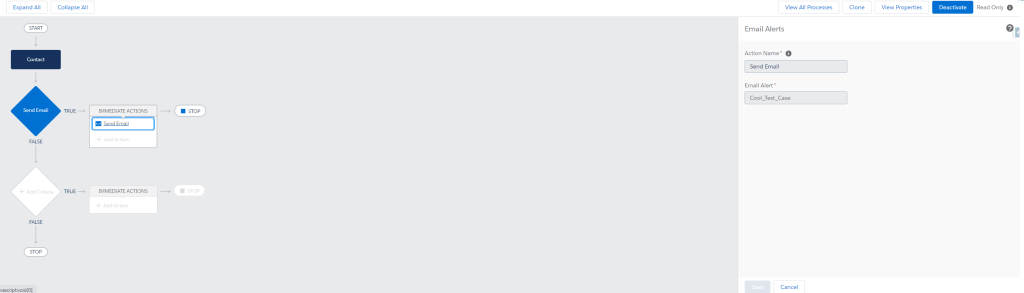
Well, we need to simply chain some process builders… First create a contact process builder that is invoked by another process builder like this:
So simple… all it does is send the email alert. “Ok, but how do I go from case creation to this one? There isn’t a contact related to these cases Shawn!?”
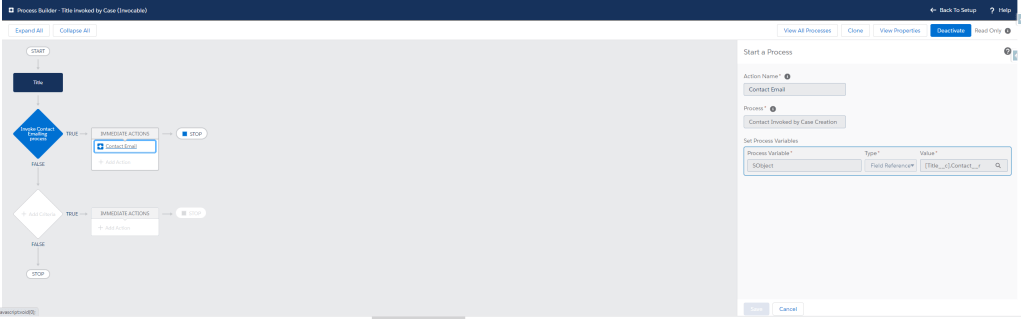
I’m glad you asked… now we will activate this process builder and create another invokable process builder on the Title custom object, which relates to contact…
This process builder will simply invoke the contact process builder which will send the email. It is important to note that this assumes at the point of creating the special internal cases that there is always a related contact on the related title… this won’t work if the title doesn’t have a contact to send into the contact process builder.
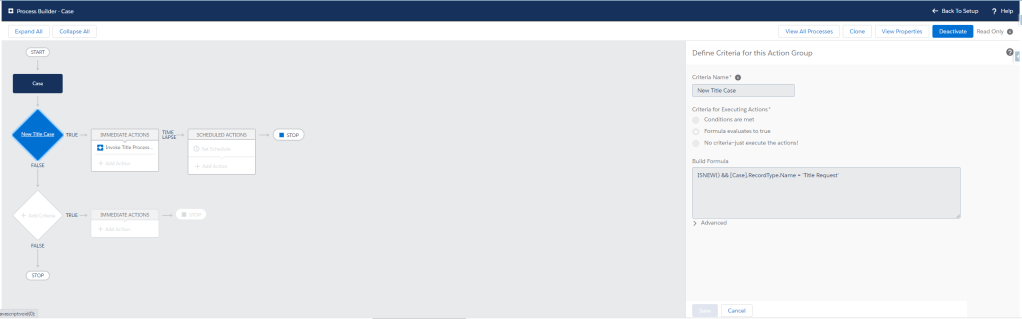
Activate this process builder and now we move to the final step… creating a case process builder to listen for the data change that we want to email the related contact on.
It should look something like this:
Note that in my case I am checking only that the case ISNEW() and it is of the type “Title Request.” Make sure your process-builder criteria is always hyper-specific and will only kick off when the intended changes are made to the record.
For example, let’s say every time a field called “color” changes to “blue” you want your process to kick off. If your criteria is simply set to “color__c = ‘blue’ ” you may end up kicking the process off if a user changes an unrelated field on a record where color already equals “blue.” To ensure that your process actions only trigger when the record is changed to meet the criteria you can click the “Advanced” checkbox. This will avoid situations like an email sending again after an unrelated change is made to the record.
That’s basically it. Go ahead and activate this one, create a contact with your email address, create a custom object record that looks up to that contact, then create a case that meets the criteria to send that contact an email and add the custom object record to that cases lookup field you are using to set in the invokable process builder and voila!
You successfully sent an email to a related record’s email address without mucking up your data architecture with unwanted duplicate-data fields, or unnecessary automation just to fill said junk email fields in. And look at you, you did it without a single line of code!
Stay tuned, because the next installment will show you how to not only choose a related recipient, but how to merge fields from the case, the title and the contact all into one email template!
What email struggles do you have in Salesforce and how do you solve them?
Recently I was dealing with a pretty unique use case and wasn’t able to find much help on the web, so I had to get creative. When I was finished I felt so empowered to do so many more things in a near-real-time fashion. I even found a bug! (or at least a gap in the documentation on queueable apex) And so, I decided I should write about it so you can come to the conclusion I did much faster than I did…
Before you take the red pill and enter the rabbit hole with me, let’s discuss how I came to this discovery… I had a community use-case and needed to create community users pragmatically… no problem right? WRONG… enter mixed DML. You know it well, that nasty apex limit for security that makes your life as a developer so much more difficult sometimes… Well I have a solution! Enter Queueable Apex!!!
The Problem:
Can you provision users with automatic assigning of permission sets, public group members, collaboration group members, managed sharing records, and any other type of configuration data required in near real time? I can 🙂 using queueable apex. The main problem I had to solve, which led me to writing a post about queueable apex was this:
I needed to allow creation and provisioning of brand new community contacts and users in a single button click, and I needed the new users to automatically come with specific permission set assignments and group assignments.
Some posts address things like the inevitable mixed DML problems faced when simply trying to programmatically create a new customer community user, as this would require a contact to be created alongside a user, something that is impossible in a single transaction in apex due to mixed DML restrictions…
However, my use-case goes a step further… I needed a new contact, a new user, new permission set assignments, AND new collaboration group members all to come from one click in real time :D! Here in lies the deeper problem… I couldn’t use @future because that only got me one more transaction deep (you cannot call another future from another future context and I needed to chain new transactions for each object required), but all of these objects need to be inserted without others… so I needed a separate transaction for the contact, the user, the permission sets, and the group members… To make things even more complicated, they have to happen in a specific order, you need the contact ID to create the Community User, you need the Community User ID to assign Permission Sets and Group Members. HOW IS THIS POSSIBLE?! Well… some would go straight to Batch Apex for the permission set and group member updates…
Batch Apex vs Queueable:
Now, a lot of developers will handle use-cases such as this by creating batch apex classes and running them often, such as once ever hour, in order to deal with the mixed DML issues received when trying to insert records along-side new users. This is perfectly acceptable, but it is important to know the pros and cons.
Running a batch, or multiple batches every hour could cause lock contention errors for users trying to update records during the batch runs.
Know your limits! There are a lot of considerations when using batch apex. You can only have 5 concurrent scheduled batch jobs running at a time and only 100 jobs in the flex queue. There is also a daily limit on number of batch apex execute methods per day that varies based on your user count. A lot of developers flock to batch apex because it is very useful to get around so many limitations that you will hit when trying to run logic within a single transaction, but there is no silver bullet in apex. It is always important to read through the considerations before using a new tool.
Running a batch job could be better in a use-case where near real time is less important and the queueable logic may be invoked per every record in scenarios that would mean full batches of 200 or more records at a time. You can only add up to 50 queueable jobs to the queue in a given transaction, so if you find yourself using queueable from a trigger that may run more than 50 times in a single transaction, you may want to go with a scheduled job instead. Just 1 queueable job in a trigger will lower the number of records one can include per batch that will meet the criteria to enqueue said job to be 50 or less before hitting an error.
Consideration When Using Queueable with @future:
Now that we have considered our options, ruled out @future methods and decided that queueable is the best option because we have small numbers of records being processed per transaction and we need the permissions to assign in near-real time AND the records to insert sequentially, it is time to discuss the magic of queueable apex and some other weird behaviors I noticed in my experience thus far.
Before I go into exactly how I solved this problem I need to make a point that isn’t explicitly clear in the documentation on queueable apex:
You CANNOT avoid mixed dml by chaining jobs out of a @future context!!!
Yes, it is true… I don’t know if this is a bug or just something not documented. We see in the docs that, “In asynchronous transactions (for example, from a batch Apex job), you can add only one job to the queue with System.enqueueJob.” Now some might say that this explains it, you can only add one job to the queue, and Shawn… you are trying to add multiple! Well… let’s think this out a bit further… you can only add one job to the queue per asynchronous transaction, but each one of the new jobs is it’s own asynchronous transaction, so as long as you only chain one job per queueable and only started with one in your @future context, it should work. This is because, “no limit is enforced on the depth of chained jobs, you can chain one job to another. You can repeat this process with each new child job to link it to a new child job.“
However, something strange happens if you try to access this infinite chain depth by starting first out of a @future method… the parent and child jobs will act as one transaction… you will see multiple jobs queued and attempted to execute, but if you try to insert permission sets in one, then group members in another, you will get a mixed DML error in the second job and both end up rolling back… This isn’t explicitly clear anywhere in the documentation or even how it should work according to the documentaion… but if you try to run this code (referenced from the previously linked article here:
public class AsyncExecutionExample implements Queueable {

    User newUser = new User();
    public AsyncExecutionExample (User newUser) {
           this.newUser = newUser;
    }
    public void execute(QueueableContext context) {
        PermissionSetAssignment p = new PermissionSetAssignment(AssigneeId = newUser.Id, PermissionSetId = 'examplePermissionSetId');
        insert p;
        ID jobID = System.enqueueJob(new AsyncExecutionExample2(newUser));
    }
}
And your example 2 job looks like this:
public class AsyncExecutionExample2 implements Queueable {

    User newUser = new User();
    public AsyncExecutionExample2 (User newUser) {
           this.newUser = newUser;
    }
    public void execute(QueueableContext context) {
        GroupMember g = new GroupMember(UserOrGroupId = newUser.Id, GroupID = 'exampleGroupId');
        insert g;
    }
}
You will actually notice that your jobs both fail due to a mixed DML issue between job 1 and job 2… something that shouldn’t happen.
The Solution:
So, to get around this, DO NOT use @future at all… Insert the user in a queueable class that chains to the permission set class, that then chains to the next groupmember class, etc… and so forth. I don’t know why out of an @future context they behave as 1 transaction when it comes to mixed DML, but just something to know.
Something like the below code (you even get the benefit of being able to pass an actual sObject into the queueable class, rather than needing to pass a bunch of primitive data types for user creation as seen in the documentation.):
//FROM PREVIOUSLY LINKED CODE...
public Id createContact(Id acctId){
    	c.accountid=acctId;
		insert c;
		System.debug('successfully created test contact with Id:' + c.id);
                //CALL THE USER CREATION FROM THE METHOD CREATING A CONTACT BY USING
                //QUEUEABLE APEX
                ID jobID = System.enqueueJob(new AsyncExecutionExample(c));
		return c.id;
    }
public class AsyncExecutionExample implements Queueable {

    Contact passedContact = new Contact();
    public AsyncExecutionExample (Contact passedContact) {
           this.passedContact = passedContact;
    }
    public void execute(QueueableContext context) {
        User u = new User(alias = 'standt', email= passedContact.email,
            emailencodingkey='UTF-8', lastname=passedcontact.lastname, languagelocalekey='en_US',
            localesidkey='en_US', profileid = 'exampleProfileId', contactId=contact.Id,
            timezonesidkey='America/Los_Angeles', username=contact.email););
        insert u;
        ID jobID = System.enqueueJob(new AsyncExecutionExample2(u));
    }
}
public class AsyncExecutionExample2 implements Queueable {

    User newUser = new User();
    public AsyncExecutionExample2 (User newUser) {
           this.newUser = newUser;
    }
    public void execute(QueueableContext context) {
        PermissionSetAssignment p = new PermissionSetAssignment(AssigneeId = newUser.Id, PermissionSetId = 'examplePermissionSetId');
        insert p;
        ID jobID = System.enqueueJob(new AsyncExecutionExample3(newUser));
    }
}
public class AsyncExecutionExample3 implements Queueable {

    User newUser = new User();
    public AsyncExecutionExample3 (User newUser) {
           this.newUser = newUser;
    }
    public void execute(QueueableContext context) {
        GroupMember g = new GroupMember(UserOrGroupId = newUser.Id, GroupID = 'exampleGroupId');
        insert g;
    }
}
By chaining the job from the contact creation to a parent queueable to create the user, to then child jobs to create the permission set assignment and group members, we avoid mixed DML, do everything in near real time and avoid some of our issues with a solution using batchable and batch chaining instead (while accruing some of our own cons which were previously expressed).
Other Considerations:
What happens if the contact inserts but for whatever reason the user insertion in the queued job fails? It may be good to have some try/catch logic added surrounding the child insertions in the queued jobs to go delete the contact if the user fails, etc… because we can’t utilize the standard rollbacks in separate transactions.
What about error handling to the end user who is creating the new Contact and User? If the user fails insertion in the batch, how can we let the end user know? … This will be a good one for you to stew on and perhaps for another fun post about asynchronous error handling :).
Conclusion:
If you need to insert objects that have mixed DML considerations to deal with (In our example inserting a new customer community user along side permission sets and group assignments) consider first using queueable apex and job chaining out of the original transaction to do so. It will allow you to get the new users set up in near real time, avoid any lock contention issues by running too many batches in the background too often, and it will avoid any issues with overloading your batch job queue. Just be aware of the queueable limitations, and the strange issue I found when trying to chain queueable jobs out of an already asynchronous context that started from an @future method.
As always I want to end asking, what weird issues have you come into contact with where Queueable Apex may help?
Hello fellow Salesforce geeks far and wide. Recently Salesforce released an update which should allow us Salesforce Developers and Admins to “Allow site guest users to upload files.“
As seen in the screenshot above, it should be as easy as checking this box right?? Well…. unfortunately not so much.
There are some catch 22’s in trying to allow site guest users to attach files to records they are submitting in a lot of practical scenarios that had me feeling a bit like the big green Banner atop this article (pun intended, I told you I am a geek).
So first, let’s dive into what those use-cases are and why simply turning on this setting and trying to accommodate for them might have you feeling a little hulkish yourself…
The Problem: Allowing for a case (or any other record) to be submitted on a public page in a community along with an attachment.
Ah yes, us community developers in Salesforce are probably used to our good old friend, the standard “Create Case Form.” This gives us some great out of the box case deflection, file attachment on case submission options and even reCAPTCHA, although reCAPTCHA v1 is no longer supported by Google and I don’t believe this component has made the update to v3… but I digress.
For this specific post, we only care about ONE thing, the very convenient “Add attachments” setting.
YES! Now I can allow the guest-site user to attach a file right? Just check the box, add this component to a public community page and viola!?
Makes sense… but no dice either. According to this documentation the OOTB Case Create Component, “Lets authenticated users attach a file to the comment in the case. Your organization’s settings control the limits for file sizes. If you enable Web-to-Case to let guest users create cases, keep in mind that guest users can’t attach files to a case.“
You can also see in this documentation that reCAPTCHA v1 is the only version supported, so you won’t get far handling that use-case for public pages with a Case Create Form either, but that is for another blog post :).
So what are we to do? Well there are a couple other options… but I will dive into why these may not work for your needs either.
Well, if you have managed to get this far, I’m going to make some assumptions about your geekiness and hope that you thought what I did “we could avoid coding if we use a flow!” You wouldn’t be wrong to think this way, after all, we just got system mode in Salesforce flows! Unfortunately, we still don’t have “without sharing” capabilities in flows, but here is an idea I just posted for it :).
Now, I will say, for internal use this can be great. For example, say you want to guide your users through a process that has a step requiring them to attach a document to a record after record insert, you can totally handle this use-case by using a screen flow. The issue with a site guest user comes down to sharing…
To use an OOTB File Upload component in a flow or even in a lightning component, you need a record id to pass into it. Now first I thought, “no problem, I will have one step create the record and the next upload the file!”
Well… here is one of those frustrating catch 22’s I was talking about… A user MUST HAVE READ ACCESS TO THE RECORD in order to upload a file against it. Here in lies the catch… If you are like me, you don’t want your site guest users having even read access to much of anything. Salesforce is raining down some hefty security alerts to this effect. Records inserted will default to an owner that isn’t the site guest user, site guest users need explicit access to classes of apex containing remote @AuraEnabled methods they need to call in components, the list goes on and on…
Needless to say, unless you are going to leave access to the record a site guest user is attaching something to public in perpetuity, you will have some trouble assuring that the end user hits the step you need them to hit every time.
For example, you would need to first create the record, keep it accessible to the site guest user, allow the file upload to occur, and only AFTER they click next from the file upload screen, revoke access to the record and the file. What if a un-suspecting user submits the form data with some personal info for only your eye, but then never makes it to the next step of the flow that removes access from the public?? This could be a data breach of a solution. No, the attachment and the record MUST both go together on the same screen, and they must both have their access revoked immediately after uploading and/or submitting.
Now we have a real “chicken or the egg” problem… “How can I let them upload a file to a record they haven’t created yet Shawn!?” you may ask. Well look no further, your patience with my geeky puns and long-winded analysis has finally paid off!
The Solution: Allowing a Site Guest user to actually attach a file to a record on submission of a new record without granting them access to either the file or the record itself!
Well if you have managed to get this far, then you must be a true Salesforce nerd and I probably don’t even need to say this, but I should hit you with a bit of a disclaimer here…
**Codey things are about to happen. Meaning, if you were looking for a declarative, nice and easy point and click solution to this very specific problem… I am sorry to say I haven’t figured one out (I promise I tried, like a lot…). Sometimes trying to hack config to fulfill a specific requirement or use-case is like trying to fit a square peg into a round hole. It just ain’t gonna happen. So, I would politely like to state that if you are reading this, it means I’m going to start providing examples of a custom aura component and controlling logic that can handle this use-case. If that sounds too nerdy for you, I don’t blame you, go enjoy learning all the wonderful and endless bits of declarative functionality in this amazing platform here, come back and prove me wrong! (Really… please… show me how to accomplish this without code, I tried and failed and it haunts me every day -_-).
Thank you for allowing me that somewhat self-indulgent disclaimer, now onto the fun part! The ACTUAL solve for this use-case!!!!
The High-Level Method:
Create a dummy record.
Insert a share record for that dummy record with read access to the site guest user for your community site (for this I used some simple anonymous apex to insert the share record…)
I also created a custom apex sharing reason for this purpose as seen in my share record here, but that really wasn’t necessary, perhaps just a good practice for this method so you know for sure why a guest user is being given access.
Use that record to insert the file against, then change the file’s association to the record they insert after actually submitting the form.
The nitty-gritty part
Don’t say I didn’t warn you… here is where we go far deeper and I talk about potential gotcha’s etc… Once you are done with this article you should really know a thing or two about aura components. Now, this code isn’t going to be the prettiest, but it gets the point across. At the end I will tie this together with some suggestions and I do plan on posting a followup where I convert the aura into LWC in the near future.
What you see posted above is a very basic aura component that is used for pretty much two things, submitting a new custom object record with only one field to fill out, the name, as well as a the OOTB file upload aura component (the LWC version can be found here).
When I finish writing and publishing this article I will be sure to provide the base code for the files discussed in this github repo, as LinkedIn is limited in technical writing tools.
The most important piece of this component is the extra “documents” empty list attribute. This is where I will be storing the returned document Ids of any files the end-user uploads. We need those Ids in a later context in order to create the proper linkage to the new file being uploaded and the record inserted.
Below is the controller for this basic component:
({
    handleUploadFinished: function (component, event, helper) {

        // Get the list of uploaded files and log them out
        var uploadedFiles = event.getParam("files");
        console.log("Files uploaded : " + uploadedFiles.length);
        console.log(uploadedFiles);

        // Get the current documentIds array from the component
        var documentIds = component.get("v.documents");

        // Push the new file Ids into the documents array for safe keeping
        // this will be used later in the submit function...
        uploadedFiles.forEach(element => documentIds.push(element.documentId));
        console.log(documentIds);

        // Set the documents array with the newly added ids...
        component.set("v.documents", documentIds);
        console.log(component.get("v.documents"));

        // Call helper function to ping server and remove the connection to the dummy
        // and change the owner of the doc to someone internal. THIS IS KEY as it ensures
        // the site guest user loses access to the files upon upload itself...
        helper.removeDummyContentLinks(component);


    },

    // This should be another helper function call, but for simplicity and time I just wrote it here...

    submit : function(component, event, helper) {

        var action = component.get("c.submitForm");

        action.setParams ({

            documents : component.get("v.documents"),
            myRecord : component.get("v.newForm")

        });

        action.setCallback(this, function(response) {
            var state = response.getState();
            if (state==="SUCCESS") {
                confirm("It Worked!");
            }
            else {
                let errors = response.getError();
                let message = 'Unknown error'; // Default error message
                // Retrieve the error message sent by the server
                if (errors && Array.isArray(errors) && errors.length > 0) {
                    message = errors[0].message;
                }
                // Display the message
                console.error(message);

            }
        });
        $A.enqueueAction(action);

    }
})
I did my best to make some comments to describe a few things… I will dig deeper after posting the rest. Below is the helper:
({
    removeDummyContentLinks : function(component) {

        // Set up params and call server-side method that will do two things:
        // 1) This removes the ContentDocumentLink between dummy record and Files Uploaded
        // 2) This changes to owner from the site guest user to an internal user
        var action = component.get("c.removeContentLinktoDummyRecord");

        action.setParams ({

            documents : component.get("v.documents")

        });

        action.setCallback(this, function(response) {
            var state = response.getState();
            if (state==="SUCCESS") {
                console.log("It Worked!");
            }
            else {
                let errors = response.getError();
                let message = 'Unknown error'; // Default error message
                // Retrieve the error message sent by the server
                if (errors && Array.isArray(errors) && errors.length > 0) {
                    message = errors[0].message;
                }
                // Display the message
                console.error(message);

            }
        });
        $A.enqueueAction(action);

    }
}
Last but certainly not least, the apex controller for this tiny component:
public without sharing class FormWithAttachmentController {


        //We will call this function in order to delete the linkage to the dummy record on file upload
        //and to change the owner of the File away from the guest-site user...
        @AuraEnabled
        public static void removeContentLinktoDummyRecord(List<String> documents){

            List<ContentDocumentLink> linksToDelete = new List<ContentDocumentLink>();
            Set<Id> documentIds = new Set<Id>();

            for(String doc : documents) {
                documentIds.add(doc);
            }

            for (ContentDocumentLink link : [SELECT Id, LinkedEntityId, ContentDocumentId FROM ContentDocumentLink WHERE ContentDocumentId IN: documentIds AND LinkedEntityId = 'a046g00000ME88jAAD']){

                linksToDelete.add(link);
            }

            delete linksToDelete;
            changeOwnerOfUpload(documentIds);
        }

        // Used to change the Owner of the file to someone internal
        // TO DO abstract this OwnerId into either the component file or custom meta-data...
        public static void changeOwnerOfUpload(Set<Id> docIds){

            List<ContentDocument> newDocs = new List<ContentDocument>();

            for (ContentDocument myDoc : [SELECT Id FROM ContentDocument WHERE Id IN: docIds]){
                myDoc.OwnerId = '0056g000000khIbAAI';
                newDocs.add(mydoc);
            }
            update newDocs;
        }

        //This method will insert the new record and then create the necessary ContentDocumentLinks
        //to associate the files with the newly submitted record.
        @AuraEnabled
        public static void submitForm(MyCustomObject__c myRecord, List<String> documents) {

            insert myRecord;
            system.debug(myRecord.Id);
            List<ContentDocumentLink> newLinks = new List<ContentDocumentLink>();

            for(String docId : documents) {

                ContentDocumentLink newLink = new ContentDocumentLink(LinkedEntityId = myRecord.Id,
                                                                      ContentDocumentId = docId,
                                                                      ShareType = 'v'
                                                                      );
                newLinks.add(newLink);
            }

            insert newLinks;

        }


}
Phew! That is a lot of code… let’s see what it got us… here
Wow… that was anti-climactic, and people like me wonder why some find coding to be boring or too dry…
Anyway, if you click into this link you should be taken to the actual public page (hosted on Salesforce itself, we eat our own dog-food in this #Ohana!) where you can take our component for a spin. You will notice that I didn’t add any actual Js to validate that the required field was filled out, there are plenty of posts and trailhead.com modules that will show you how to do this. I really just want to focus on the file upload logic and the re-parenting of the files logic for this post.
Go ahead and open the console, I will explain what magic is occurring in the code to solve our seemingly simple, but actually quite complex “chicken/egg” problem.
Part 1 of the component logic:
First of all… pick a file, any file… or even a couple to upload. On second thought, not any file… I would make them jpeg files (as you can see for this example I am only accepting .jpg and .jpeg files from the component attribute called “accept”) and make them very small files. This is just hosted on a playground org, so soon after my post, if people mess with it a lot, they will end up hitting the storage limits of my org. I’ll try to clean it out from time to time…
If you open your console as you are playing around, you will see a couple things log out in the console…
This is showing after I uploaded one file, I get a message letting me know that the server was hit successfully and that “It Worked!” I also see the “documents” attribute print out that I successfully pushed in the new document Id into said component attribute. I think it is worth noting as well, that if you load multiple documents you will see that the documents attribute shows multiple Ids added.
This is an important distinction because the user could click “upload files” multiple times, so it wasn’t sufficient to simply replace the attribute (using component.set(“v.documents”, x) with the returned “uploadedFiles” documentId’s from the ‘event.getparam(“files”);’ code in the handleUploadFinished function.
If you simply replace entirely instead of push the Ids into the list, you will only be storing the Ids uploaded from the last click, not all of them. This matters later, in Part 2, when we need to re-parent all the documents to the new record.
So what exactly “worked”? Well, my “handleUploadFinished” Js controller function is what gets called when you click “Done” in the upload component… as per the standard component documentation here.
I have this handleUploadFinished function send the apex controller the list of document Ids and the apex controller finds the ContentDocumentLink records that are used to associate the files to the dummy record. Remember, I needed to provide the standard component with a dummy record Id which the site guest user had access to, so that the file upload would work. Now I must find that linkage and remove it, so the site guest users doesn’t publicly expose what my customer is uploading. While I’m at it, I call another apex controller method in the same context that will change the owner of the file to something other than the site guest user (**NOTE: It isn’t in my code, but I would send that ownerId in from the component itself or store it in a custom metadata type for ease of configuration if you would need to change said user, etc…).
Just like that!! We have successfully taken a file upload from a site guest user on a public community page and instantaneously removed access from the public user at the same time! Notice that to perform all these actions in the background we need the apex controller to be a “without sharing” controller. I will also note that to expose this component to the site guest user, they must have read/create access on both the object used to submit the record and on the document object. Moreover, with the upcoming security updates, mentioned earlier, you will need to grant this site guest user explicit access to the apex controller so it can utilize the @AuraEnabled methods in said controller.
Part 2:
Ok, now we are cooking! We have successfully uploaded our files, whilst keeping them secure and we are ready to submit our record.
For the purposes of this demo, I just have one input field… “Name” (riveting I know…). Now, all that is left is to submit my form and let the controller do its magic a second time!
After providing a name for my record and finishing my attachments I click submit and I get an “It Worked!” confirmation from the callback function on success. What “worked” this time?? Let’s walk through it like last time.
So for this example I got a bit lazy and just put my submit logic directly in my controller… but it probably should be abstracted to the helper. Either way, the concept here is the same.
Submit is clicked, which onclick will call my “submit” function in my Js controller. This will then set my params and send the custom object record and document Ids to my apex controller so the server can work its magic!
On the server side, this time two things also happen. The first is that the record I submitted to the server is inserted (FINALLY we have a record Id for the actual record we want these docs to be uploaded to). Next we need to create the proper ContentDocumentLinks that will associate the files to this new record.
So we have a method that does exactly this…
**NOTE that this time I don’t need to explicitly update the owner of the record because I can set that in my actual sObject attribute ahead of sending it to the server which will save us a dml statement.
And there we have it!
It’s… A NEW RECORD!!! (for any Super Smash Brothers fans out there) owned by me, not the site guest user, with two photos attached, also owned by me, of a devilishly handsome trailblazer from Chapel Hill!
If it seems like a lot, it is, but securing your files and data in more than just an obscuring fashion is of upmost importance in today’s day and age. Hopefully this post will save you all the time it took me to think about and write up!
Conclusion and Final thoughts…
Well, there you have it. A complex solution to a simple, but tricky problem! This is why Salesforce is such a powerful platform, it can’t tell me I can’t do something! We get the flexibility we need in a bind with a plethora of tools OOTB to help when we don’t.
I would like to mention some potential improvements to this…
In the real world, I would have abstracted the file upload component and handling logic into its own separate embedded component complete with its own apex controller. WHY you might ask? Because then I could make it re-useable across ANY form that needed this type of file upload handling. Imagine being able to drop that file upload into any form and it just handles the reparenting of the files for you for any public form!? This IS do-able by splitting it out into it’s own component with it’s own attributes and controlling logic. For the purposes of this post I wanted to keep it light, but perhaps I will refactor to this model in the future to show an example.
Another note is that this is an aura component in the days of LWC, there is a similar Lightning Web Component for file uploads that takes the same params and returns the same objects on successful upload. I DO plan to write a post of how to re-factor this into the LWC framework to help bridge the gap between aura components and LWC, so be on the lookout for that one.
The last thing I wanted to mention is that no fully fleshed out, code-based blog post comes in a nice neat package. These things take trial and error and it is ok to struggle when learning new things. I wasn’t even learning much new here and I still struggled with some syntax and error handling. There is A LOT more you could add to this… more fields, a component to display the files you have uploaded so far, more abstracted methods, better styling, etc… please feel free to show me what you think, comment and improve on this. It truly is just the beginning and no code is beyond improving!
So what do you think? Have you run into this frustration or use-case and how did you solve for it? If there is a better way, please let me know. Feel free to comment, ask questions and even push changes to my github. Part of teaching is learning :), so please feel free to teach me!
Here is an article that helped me get a better grasp on this component.